Hi! First a quick update from last week's competition, SUSSEXMOUSE won the doodle monster puppet! Well done Marion! She named him Mr Bunting. :)
Now then, back to this week's project.
This week I learned how to reverse applique!
It's where you sew on to layers of fabric then cut the top layer away to show what's underneath.
I made this spangly fishy picture with reverse applique!
Want to know how to make one? Your shape doesn't have to be a fish it could be any shape you like!
You will need:
- Scissors
- Glue
- Card, two A6 pieces
- Pencil
- Lots of ribbon or strips of fabric
- Sequins on a string
- Needle and thread or a sewing machine
- A6 piece of fabric, mine's spotty and blue.
Step 1.
Draw a fish shape or any shape you want on to one of your pieces of card.
Draw around it on to the middle of the other piece of card.
Draw around the shape on to the right side of the piece of cloth in the middle again.
Step 2.
Start arranging your ribbon and fabric where you want it, overlap your pencil lines by quite a lot.
When you have them all cut and positioned, put them to one side and spread glue all over the fish outline and on to the card surrounding it.
Now layer up the fabric and ribbon on top.
Glue on your sequin strings and anything else you'd like to.
Mine looked like this:
Step 3.
Take your covered shape and sew some decorative stitches over the top of it. Go sideways and up and down and round and round if you like. This helps secure the ribbon and sequins. you can sew straight over the sequin strings with your machine.
You don't have to do this bit on a machine but it's much quicker if you do.
Here's what mine looked like at this point:
Step 4.
Lay your A6 fabric piece over the top of your ribbony sewn piece.
Make sure the fish shape is over the ribbon underneath by lifting each corner of the shape.
Glue down the corners of the fabric to the card
Sew around the pencil outline you drew on the fabric. Look at the GETTING STARTED post to help you with the sewing if you need to.
I sewed around the line a couple of times to give a sketchy look. I also added details like an eye and body lines.
Step 5.
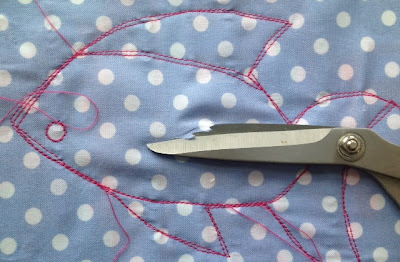
Snip in to the middle bit of the top fabric inside your shape, try your best not to snip the ribbon layer underneath.
Snip towards the stitches and cut along the line. Try not to snip your stitches by mistake!
Here's mine half done:
All finished!
Holly.


Lovely! Xx
ReplyDeleteSmashing idea and it looks great : )
ReplyDeleteExcelente tutorial! Gracias por compartir. Me gustó mucho el resultado. Lo voy a poner en práctica. Un abrazo desde Venezuela!
ReplyDeleteВау!!! Замечательная рыба!
ReplyDeleteGostei!!!!!
ReplyDeleteThank you so much I've really really wanted to know how to do this and now you've shown me how.
ReplyDelete