
This week's project is an easy one, good for adapting to your own design!
I have made a tiger keyring with a simple teddy bear shape. You could make any animal this way, a panda, a monkey, a polar bear, just choose different colours of felt and decorate them with different features. You could sketch a few simple teddy shapes and draw different animals on to them, this will help you decide what to make.

You will need:

- Felt to match the animal you'd like to make. I have orange and dark brown here for my tiger.
- Stuffing.
- Scissors.
- Some paper.
- A pencil.
- Some ribbon.
- Thread to match your felt.
- Small beads for eyes.
- Glue.
- A needle.
- Some pins.
- A key ring trigger hook. Optional, you don't have to make a key ring.
Step 1.
Body parts.
Draw this simple teddy shape on to some paper. The long oval is for the arms and legs. Make sure you don't draw the oval too small, make it as long as the head and about as wide as your finger.

Cut these out.

Fold the body in half to make sure it's roughly symmetrical, it doesn't have to be exact but you can trim it a bit if you like. I did.

Fold part of the felt over so its doubled and pin the body shape on. When you cut the body out, you'll get two pieces, a front and a back. Draw around the oval shape four times, two arms and two legs.

Cut out the shapes, you should end up with these parts:
Four ovals and two body pieces.

Step 2.
Construction.
Lay the arms and legs on to one of the body pieces like I have below:

Put the other body piece on top, making sure it matches up at the ears and the sides and bottom. If not you might need to flip the top body piece over to get it to line up. Move the arms and legs around a bit if you want to, make them look nice.

Put pins through the body where the arms and legs are, this will hold the limbs where you want them.

Sew the beads on to the top layer of the body, starting on the inside to hide your knot.

Fold back the top layer of the body out of the way. Thread the ribbon through the hoop on the keyring hook. Arrange them like mine in the picture below. Cut a small scrap of felt and put glue all over one side. We're going to use the gluey scrap of felt like a piece of sticky tape.

Trap the ends of the ribbon under the scrap of felt and press down firmly to hold the ribbon in place.


Choose the thread you'd like to use and start with the knot on the inside like in the picture below.

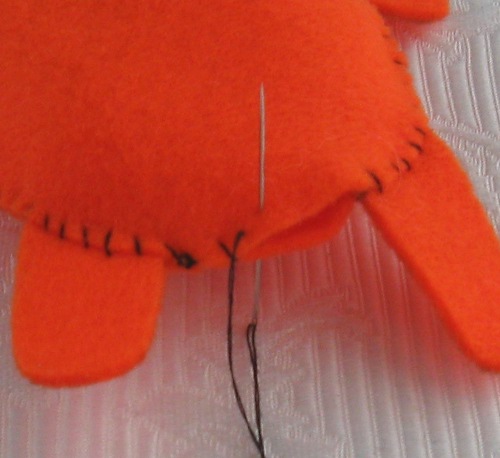
Sew almost all the way around the edge with over stitch. When it comes to the limbs, go through them like this:

Make sure you sew through all of the arms and legs but leave a section open between two of the limbs like I have here:

Step 3.
Stuffing.
Using your pencil, poke stuffing in through the bit you left open. I didn't stuff mine too full as I wanted a squishy look.

Sew up the hole using over stitch, hiding your knot on the inside.
Step 4.
Decorating!
The picture below shows how I cut out my tiger's stripes. I laid them on his body in a few different ways before I decided where they looked best. If you aren't making a tiger, have a look at the animal you are making on the internet or in a book to make sure what features you need.

Glue the features on. If you don't like getting gluey hands you could use tweezers to hold the stripes as you glue and place them.

Don't forget to do the back too!

Here's Bengali my tiger dangling from the door, looking forward to the adventures he'll have as my keyring!

I'd love to see your designs! You can upload pictures here: http://www.flickr.com/groups/sewingtuesday/
Did you make a tiger like me? I might have a go at making a monkey next.
No comments:
Post a Comment